Over the years it has become a little easier to find certain domain information on various hosting provider control panels. However if you’re not in these areas often like a developer, it could be a bit confusing on how to find the information you’re looking for without clicking around and seeming to be going in circles. With the following screenshots and steps you’ll be able to find your domain authentication code (AUTH) in order to transfer your registered domain from GoDaddy to another hosting provider.
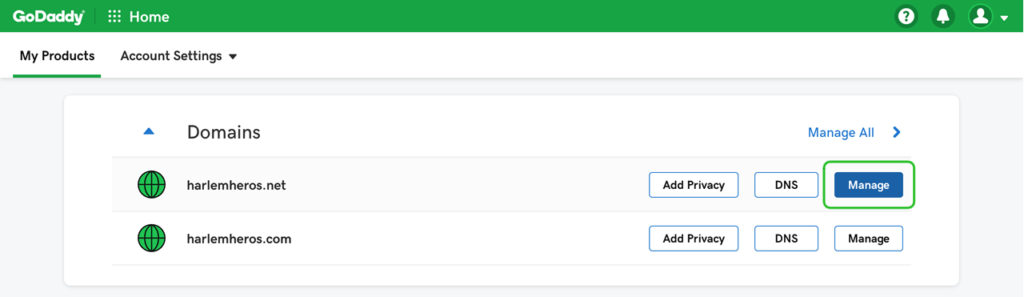
To start you’ll need to log into your account and get to My Products. From there you’ll see your list of domains. Click the MANAGE button to the right of the domain you’re looking to get the AUTH code for.
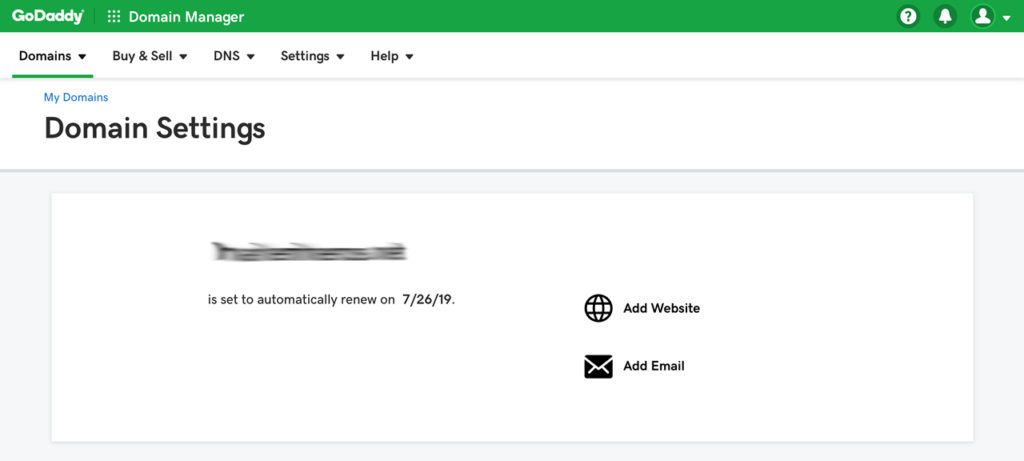
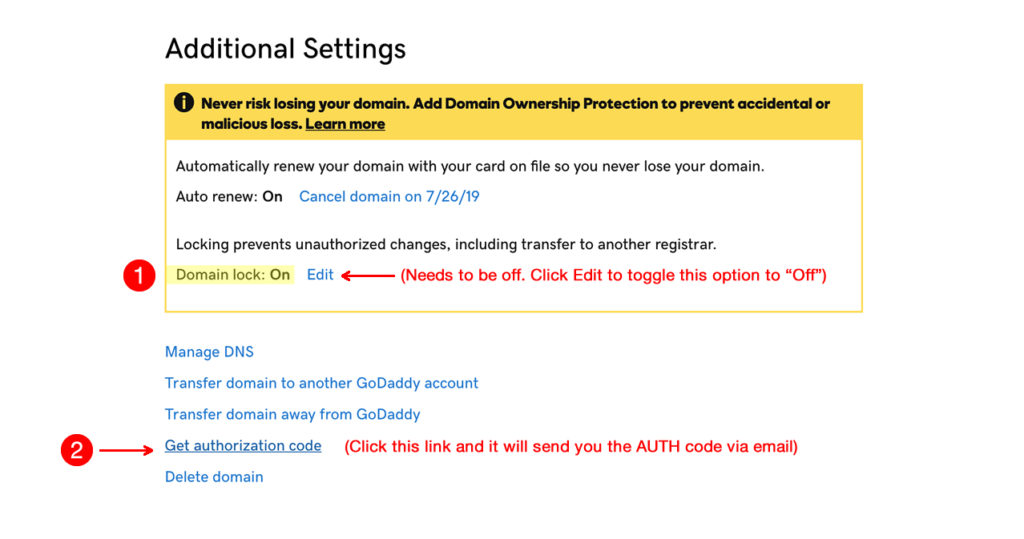
Once you click that you’ll be taken to the Domain Settings page. Scroll down from this view.
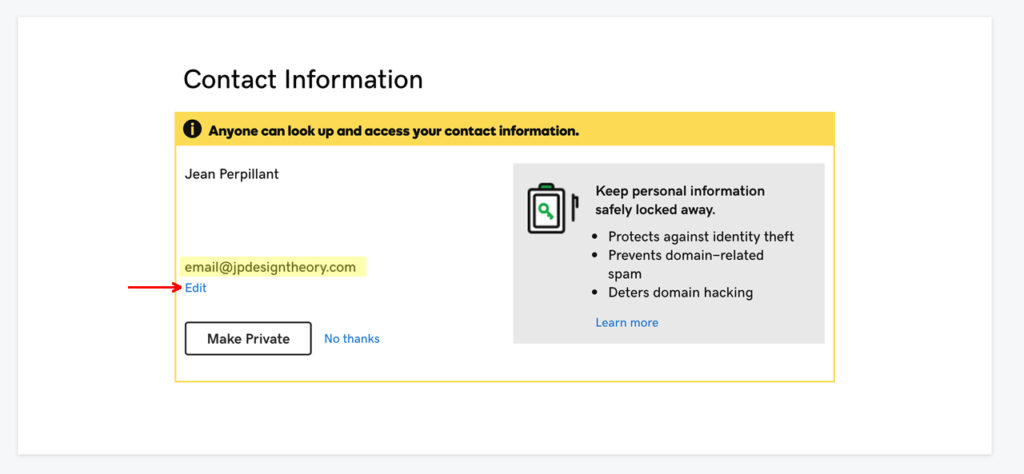
Next you’ll want to edit the domain contact information. If this shows a different name, address, or email address you’ll need to update this before you continue further. Otherwise the AUTH code that you want to retrieve will be sent to the person listed and email address listed here.
Next you’ll need to update the Domain Lock. By default you’ll usually find this set to “On”. But in order to transfer the domain away, you’ll need this to be toggled off. This is a security feature to help keep your registered domain from being illegally or illegitimately transferred to a new owner.
So click the “edit” button and flip the toggle to turn this option off. Then you’ll see the “Get authorization code” link below. Click that and this will prompt an automatic response to email the code to the email address that was listed above in the Contact Information area.
And that’s it. The code is usually emailed out in minutes, where you can then initiate the domain transfer with your new hosting provider by using the AUTH code. Transfers usually take 7-10 days, but we’ve been able to process some in one day if all the domain transfer acknowledgements happen as soon as they are received. What normally happens is when a transfer request is sent, the registered email from the current hosting provider is sent an email to acknowledge the transfer. In that email is a link to a secure page to either accept or deny the domain transfer. Once that is completed there may be another email to the new hosting account to also acknowledge the transfer. Once approved the release is usually done in hours, though internet propagation can take 24 hours.
We hope this was helpful for you! If you have any questions be sure to Contact Us.
If you’ve been using Google Analytics for tracking your website data, but need to grant access to someone, this is the article for you. The whole process takes less than 5 minutes to complete.
First you’ll want to log into your Google Analytics account. Once logged in you’ll be seeing your main Dashboard with some quick information like a graph and traffic information. Look on the left for the navigation options and click on the Admin link at the bottom left.
Once there, you’ll see your account name and then a few links in the middle. One of which says User Management. You’ll want to click that next. This will bring up a screen with any existing users that have access and also display their level of access. You have the ability at this point to modify any of those rights as well as remove any users who should no longer have access to your data.
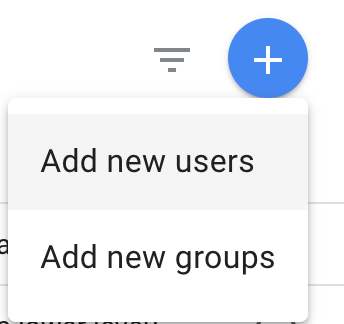
On the top right you’ll find a big blue + symbol, click on Add new users.
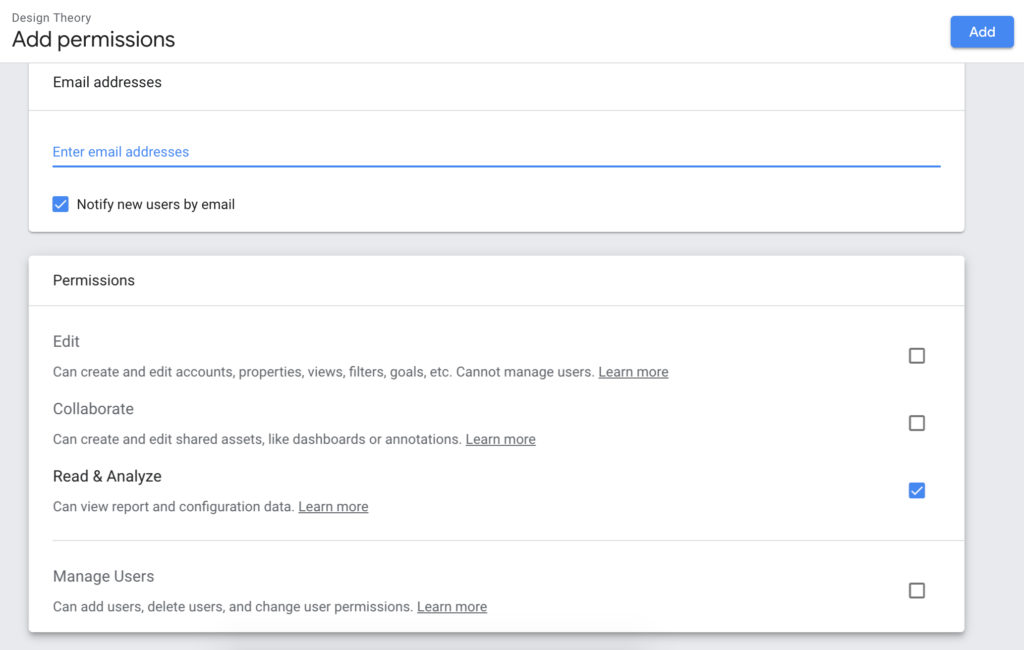
This will being up a screen that will give you the ability to add a new user. You’ll want to enter their Gmail account. And below that you can specify their level of access in the Permissions box. It’s self explanatory, but if someone needs more than just the ability to view and read your data, you’ll be able to grant that access here.
This is helpful when working with a marketing account manager who will be helping you with your digital marketing efforts, as well as a web designer/developer. The data found in your analytics will help show the following:
Number of people visiting your website
Where in the world people are visiting your website
Keywords people are using
Bounce rate
Average time spent on each page
Audience details
Mobile and desktop views and behaviors
And so much more
I hope this was quick and helpful to you. If you have any questions please feel free to contact us or leave a comment below.
Recently we were asked to help setup a Facebook Business page and unless you follow the blogs on Facebook, each time you want to go in and make a change, they’ve updated their user interface and move things around. It’s supposed to make things easier but I beg to differ.
Anyways if you currently have a Facebook page now and use Messenger, you’ll want to be sure you turn on or even edit the options in the Response Assistant. It’s easy enough to get to (once you’ve found it the first time) by hitting the Settings at the top right then Messaging on the right menu
Once there scroll down until you see the Response Assistant.
Take a few minutes to fill out what you’d like your custom messages to be for each option. Be sure to save when you’re done, and you’re all set!
In this short instructional video, you’ll see how easy it is to connect your website to your social media channels so that when you publish a new post, it will automatically post to your social media accounts. Once you’ve installed and activated Jetpack you’ll be able to connect to Twitter, Facebook, Google+, and Linked In.
In this short video you will see how quick and easy it is to create a new blog post. You’ll want to log into your Dashboard in order to see the menu options on the left and continue from this video.
Creating a new user profile is essential when you’re going to have multiple people accessing your website. Below are the available roles for user profiles and what access and rights they have.
Administrator – The main account(s) with access to everything. Usually reserved for your web designer, and site owner.
Author – Can create pages and posts and publish them without the need to have them reviewed.
Editor – These user profiles are mainly used for people who will be reviewing posts written by Contributors.
Contributor – May create new posts and submit them for review by Editors or Authors and above.
Subscriber – Mainly to view new content that is published to your website. May also receive email notifications for new posts.