Have you ever been to a website that loaded very slowly? Did that website have some images that loaded abnormally slow, even though they weren’t that large in size? The reason for that may be that the images were re-sized improperly, most likely with a WYSIWYG (What You See Is What You Get) webpage editor such as Adobe Dreamweaver. This problem could have been avoided if the images were optimized.
Adobe Dreamweaver is a very powerful webpage editor that can be used to customize just about everything on your website, including specifying or adjusting the resolution of your images. When you click on an image you have inserted into Dreamweaver, you get the properties window, which allows you to specify the size of the image (resolution) and a host of other options.
Notice in the the above example the image file size is 4162K. That means it’s about 4162 kilobytes (or about 4 MB) which is very large. Also notice that the W and H (width and height) values are both in bold. That means that the current size of the image (266 x 140) is not the actual size of it (4096 x 2160). If you click on the refresh button next to the image size Dreamweaver will resize the image to the proper size (4096 x 2160).
If you change the size of an image using Dreamweaver’s image properties tab, you will just be changing the image’s resolution and not the actual file size. Using this method to downsize large images will make the images load very slowly.
This is NOT a good method for re-sizing an image for a webpage!
Dreamweaver wasn’t designed to be used for editing images. The purpose of the width and height boxes in the properties tab is to specify a resolution (size) for the image or object you have selected if there are no dimensions specified. A much better way of optimizing images is with Adobe Photoshop.
Using Photoshop to Optimize Images
If you have Adobe Photoshop, then you have the perfect tool for optimizing your images to display on your website. Here are some quick and easy steps to optimize your image in Photoshop:
1. Open the image (File > Open)
2. Re-size the image with the image properties window (Image > Image Size)
Notice at the top of the window where it says “Pixel Dimensions:” that the file size of the downsized image is now 109.3K which is a whole heck of a lot smaller than the original image file size of 25.3 MB.
3. Instead of “Save” or “Save As” use the “Save for Web & Devices” option (File > Save for Web & Devices).
If you look at the top right corner of the Save for Web & Devices window you will see these options:
Most of the time, I alternate between the 70 and 60 quality setting depending on the size of the image. I have set this image to the JPEG High preset, which gives the image 60 quality by default. If you are re-sizing an image for a thumbnail (320 x 240 or below) 60 is a great setting because you won’t see any degradation in quality from the original. I use the 60 quality setting most of the time, unless the image is very large (1024 x 768 or larger).
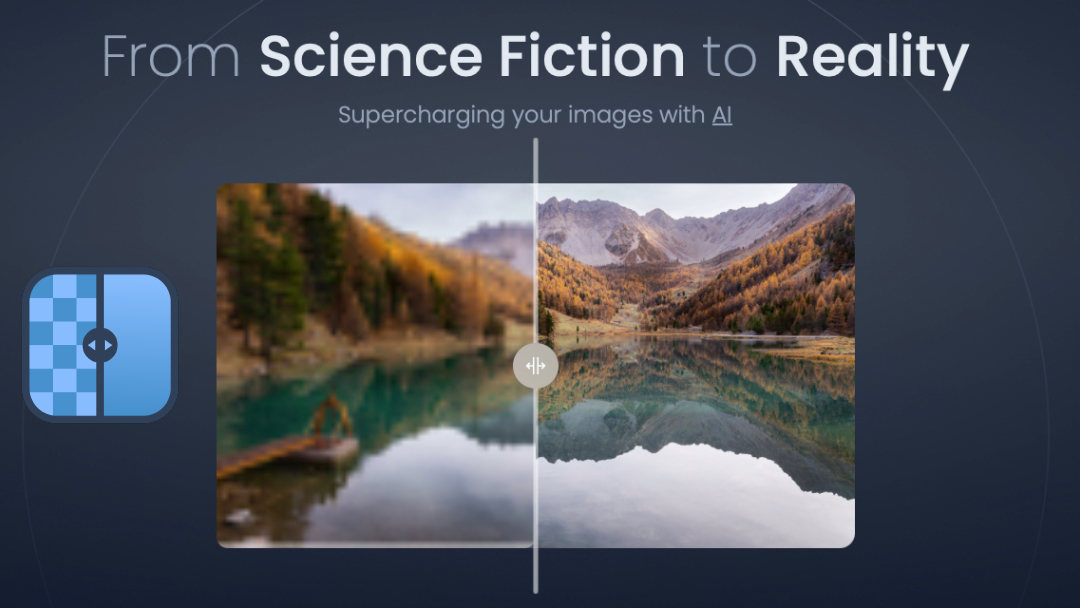
Original quality vs 60 quality
The original on the left is full quality (no compression) and the optimized on the right is 60 quality. At this smaller size, it’s hard to see any degradation in image quality at the 60 setting. As you can see, the optimized image on the right has an estimated load time of 3 seconds for a 56k dial-up connection. Of course, most users today have cable and other much faster connections, but it’s nice to know that even on the slowest connection, the image still won’t take too long to load.
4. Upload the new and improved image to your website!
Now you’re ready to load the optimized image(s) into Dreamweaver or whichever editor you use for your website.
Video of Image re-sized using Dreamweaver vs. Photoshop Method
As you can see in this video, the image that was optimized using my Photoshop method (on the left) loads a lot faster than the image that was re-sized using only Dreamweaver (on the right). The optimized image loads almost instantaneously!
TGIF! Time for some free stuff! Check out this collection of free web buttons, provided by Sketchdock.com. You can download the collection in .PSD format for easy editing in Adobe Photoshop. Enjoy!
Have you ever wondered how some websites are able to integrate images so seamlessly with the background of the page that they just blend in?
Most of those websites accomplish this by removing the original background of the image and either making it transparent (see-through) or changing it to another color or another background all-together. It’s all matched to the theme of the website.
For example, notice the pastor and elder of the First Church of the Living God website (created by Design Theory) in the image below. They blend right in with the clouds in the background.
Today, I will be showing you how to remove the background of an image easily and quickly with Adobe Photoshop.
* Before you start, make sure you have opened an image in Photoshop (File > Open) *
Step 1: Select the Magic Wand Tool
Select the Magic Wand tool, located in the left menu bar.
Step 2: Configure the Magic Wand Tool
Once you have selected the Magic Wand tool, you will need to configure it using the options located near the top menu bar. For basic background removal, tolerance is the only option you need to concern yourself with in the Magic Wand configuration options. Tolerance determines how closely to match colors, and a higher tolerance means a larger selection. For this example, I used a value of 70 for tolerance because if you use anything lower you will get an ugly jagged-edged blue border around the image.
Step 3: Select the Background with the Magic Wand Tool
Now that you have selected the Magic Wand tool and configured its tolerance level, you will need to select the background in the image. Click anywhere in the background of the image and the Magic Wand will automatically detect the colors of the image, and, if there aren’t too many different colors in the image, it will detect the background. Now you see why they call it the “Magic” Wand! In this case, the background is almost a solid blue so the Magic Wand has no trouble detecting the background, and it only takes one click. If the background is not solid, or is busier than the background in this particular example, you will have to hold the shift key while you click on each color that is part of the background (Hold shift + left click). This is a basic tutorial, however, so I won’t be diving into how to do that now.
Step 4: Delete the Background
Now that you have selected the Magic Wand tool, set its tolerance level and selected the background, you simply hit the delete key and voila, no background! You are now free to use this image with just about any background you can think of.
Here is an example of what I did with my tiger:
As you can see, I replaced the background with a solid black color and added some text of a company I made up. This is an example of how you could implement this tiger picture as a logo/header element on your website. There are a lot of other ways to use this skill to make your websites look very professional and seamless.
If you have this skill and use it for your own professional application, please share your experience. If not, was this tutorial helpful to you?
Now that the lovey-dovey mood, which Valentine’s Day brings has come and went, I start wondering what can I do to catch the wanted client who is still passing me by. Do you ever wonder what makes a client choose one designer over another? There are some big lies out there on how to get a client, but there are some exciting facts that show what clients really want from a designer.
“Repetition does not transform a lie into a truth”. FDR
Lies, myths and false statements
It’s important to understand a few myths we as designers have come to believe about being hired by a client.
Clients only want experience
Designers (especially recently graduated) think they don’t have a chance to be hired by a client because they have no real experience. Don’t let this lie stop you from finding great clients who are looking for a young, fresh approach to their design process.
A lot of clients would prefer to hire someone they feel has a lot to learn, rather than, someone who is set in their stubborn ways.
Clients hire designers who have a great portfolio
Similar to the first lie, a lot of naive designers think that unless they have a vast portfolio, no client is going to hire them.
In fact, it’s the opposite. Choose a few really strong projects, highlight them effectively in a portfolio, and show them off with pride. If you do this right, a smart client will hire you.
Clients only hire cheap designers
Most designers feel like they have to have the best bargain in order for clients to hire them. The truth is, most clients are willing to pay a little more for quality designs. Most clients are also willing to pay more money for a designer who is easy and enjoyable to work with.
Find ways to add quality to your client/designer relationship and you won’t have to lower your prices in order to get hired.
All truths are easy to understand once they are discovered; the point is to discover them. Galileo Galilei
Facts, truths and real statements
Clients hire responsible and easy to work with designers
Clients are usually more interested in the working relationship they will have with you than almost anything else. If they can’t work with you, if you won’t listen to them, or if you’re rude, they won’t care how great your designs look; you’ll never get hired.
Make sure you present yourself as a responsible and agreeable person, that way you’ll be more likely to get hired.
Clients wants designers who are respectful
You can have your own opinion, but when you intentionally insult, degrade, or talk down to your clients, you’ll quickly have a one-way ticket to unemployment.
Clients look for designers who respect their opinions. Be respectful.
Clients look for designers with the skills needed to complete their project well
You may not be the best designer in the world, but your potential clients may not be looking for that. They are looking for someone who possesses the skills necessary to complete the job well and on time.
That doesn’t just include design skills or a fancy portfolio either. They are looking for someone with a good work ethic, a personable attitude, great project management skills, and superb people skills.
These are some lies and facts of what clients want from a designer. What are some other pointers that will guide us to reach more clients, effectively?
What other tips and pointers would you add to this list? If you were a client, what would you look for in a designer?
We are in February and my friends like to call it the “month of love”; I guess that’s why I feel like talking about KISS. My husband tries to use it all the time and lately I found myself applying KISS to most of my designs. You don’t know how to? It’s basic, just Keep It Simple S(weetheart)…naaaa, Keep It Simple Stupid!
As graphic designers we should apply this rule for many reasons, but the most important, is for our own mental health.
Let me show you why I love to KISS:
Communication
Graphic design is a form of creative communication and KISS is the key ingredient of communication. When you speak with fewer words, usually your point is more clearly addressed and when you design with fewer elements your message does not get lost by everything else going on.
The moment you have to explain your design to anyone, the whole purpose of creating it is lost.
Google
Google is a great example of KISS. As one of the biggest companies, they simply have a logo above their search box on a blank white page; as simple as it gets.
Being Different
There is plenty of advertising clutter out there and if you’re trying to stand out amidst all the colors, flashy images and more, then you need to do something different, you need to KISS.
KISS Sells
When everyone’s trying to be a pioneer, they are overlooking the primary reason for their designs and creativity – to sell. If your product doesn’t sell, an award winning design will get you nowhere. You can have the coolest business cards and the craziest letterheads, but if they don’t match your company’s image, it means nothing.
Since all of this is completely true and despite their apparent simplicity, effective graphic design is not created randomly or by chance. When designs are simple they are well created – they last indefinitely.
“Any fool can make things complicated, but it takes a genius to make things simple” E.F. Schumacher
In this month and for the rest of the year, how will you KISS?
Ok we’re calling out for those funny times of your design careers that something may have come up, a situation, a mistake, anything that you’d like to confess. Could be anonymous if you like. Please send all of your stories (quick or long) to confess@jpdesigntheory.com


 Ok we’re calling out for those funny times of your design careers that something may have come up, a situation, a mistake, anything that you’d like to confess. Could be anonymous if you like. Please send all of your stories (quick or long) to confess@jpdesigntheory.com